How to dust for a fingerprint:
1. You must first find a place were you think a fingerprint might be, like door handles, walls, windows; anywhere someone might touch.
2. Get a pencil and sharpen it so you get the flakes of grey led from it. Police and Forensic scientists use special black, white and other coloured power. The different colours are used for different things, you wouldn't use the red powder on a red bucket, for instance, you would use the black, blue or green.
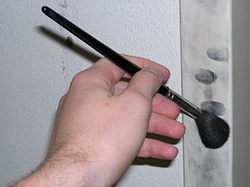
3. Get the fine powder and place it on the place where you want the print. You can use a make up brush or anthing that will get the job done. we need to brush it all around the object so we can get a clear covering.
4. The finger print should now becoming visible. Once you get a clear idea of where the print is, get some sticky tape and place it over the print.
5. peel the tape of and there you go. You have you very own fingerprint. Place you stickytape with the fingerprint on a white peace of paper and see for you self.
How easy was that? Now what do the Police and forensic scientists do with the print after they have got it?
2. Get a pencil and sharpen it so you get the flakes of grey led from it. Police and Forensic scientists use special black, white and other coloured power. The different colours are used for different things, you wouldn't use the red powder on a red bucket, for instance, you would use the black, blue or green.
3. Get the fine powder and place it on the place where you want the print. You can use a make up brush or anthing that will get the job done. we need to brush it all around the object so we can get a clear covering.
4. The finger print should now becoming visible. Once you get a clear idea of where the print is, get some sticky tape and place it over the print.
5. peel the tape of and there you go. You have you very own fingerprint. Place you stickytape with the fingerprint on a white peace of paper and see for you self.
How easy was that? Now what do the Police and forensic scientists do with the print after they have got it?
How to take a fingerprint using an inkpad:
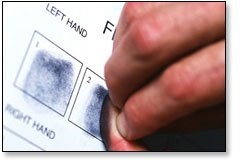
In order to take advantage of the natural movement in making finger impressions, the hand should be rotated from the awkward to the easy position. This requires that the thumbs be rolled toward and the fingers away from the center of the person's body. This process relieves strain and leaves the fingers relaxed upon the completion of the rolling so they may be lifted easily from the card without danger of slipping, which smudges and blurs the prints. In taking the rolled impressions, the side of the bulb of the finger (tip of finger to below first joint) is placed upon the inking plate and the finger is rolled to the other side (fingernail to fingernail) until it faces the opposite direction. Care should be exercised so each finger is inked evenly from the tip to below the first joint. It is better to ink and print each finger separately beginning with the right thumb, and then in order, the index finger, middle, ring and little finger.
